Back to TheWorxHub for Senior Living Main Menu
Adding a Work Request
TheWorxHub allows you to create both a work request and a work order. A work request is generally entered by a staff member and then approved and accepted as a work order by the responsible department.
How to Add a Work Request
You can access the request form in two ways:
-
From the Dashboard, click on the Requestor tab.
-
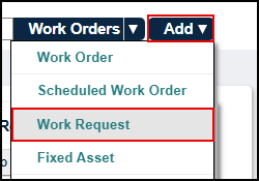
Or click on the Add button in the top right corner of the screen and select Work Request from the drop down.
-
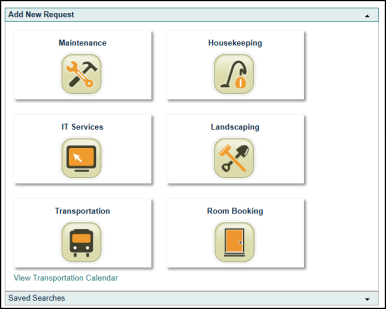
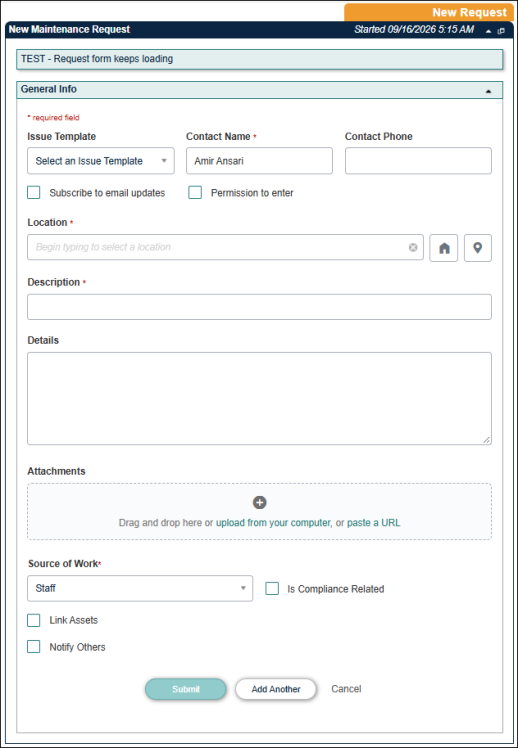
From the Add New Request screen, select the application for which you are submitting this request.
-
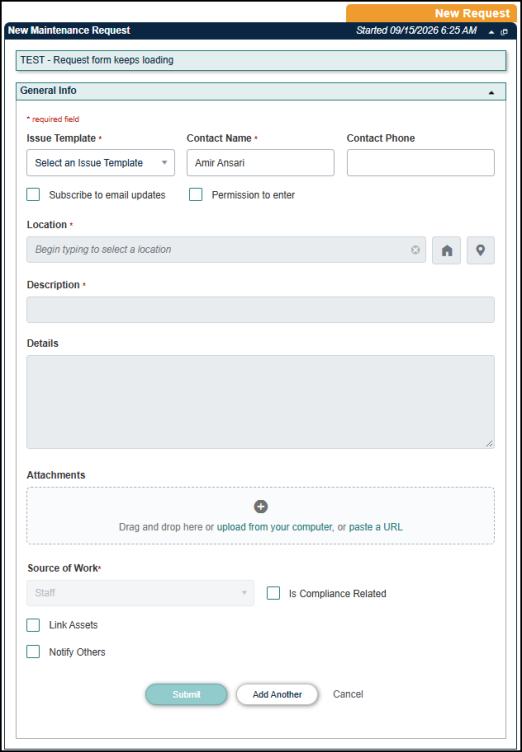
Enter Contact Name.
-
Enter Contact Phone number.
-
Click the Subscribe to email update to receive update notifications for this request.
-
Select Permission to enter to indicate that maintenance staff are authorized to enter the unit.
-
If Permission to enter is enabled in the resident record, the checkbox is automatically selected when that resident's location is chosen.
-
The request creator can also manually select the checkbox to notify the technician that entry is permitted.
-
-
Click on the Location Picker (
 ) to select a Location for the request.
-
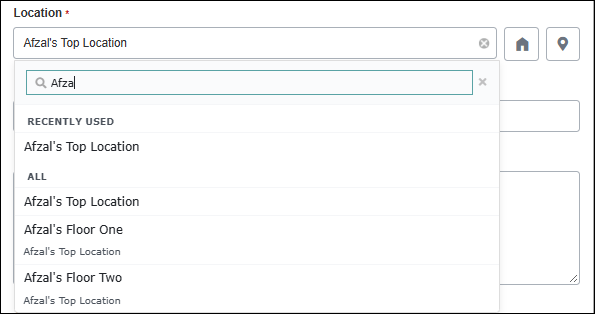
Use the type-ahead search to quickly find locations.
-
View the Recently Used section, which displays the five most recently selected locations.
-
Browse all available locations from the “All” location list.
-
Locations are displayed in a two-line format showing the location name and its hierarchical path.
-
Navigate search results using the keyboard and use the clear/reset (
 ) option to start a new search.
-
If you have access to the Space Management application, click the map pin icon (
 ) to select a location from a floor plan drawing.
Note: If you do not currently have this application, please contact your Sales Representative or Client Services for more information.
-
-
Enter a Description for the work that needs to be performed.
-
Type any additional details and notes in the Details box.
-
Choose a Source of Work from the pick list.
-
Check the Is Compliance Related box if the work will be performed to fulfill a compliance requirement.
Note: The Is Compliance Related box is only visible for users with the Can See Compliance Checkbox permission in User Roles Settings.
-
Click the Link Assets check box to link the associate work request with an asset.
-
The assets listed are items that are assigned to the location selected on the work request. You can expand this list to include all assets by clicking the Show All Assets checkbox.
-
To narrow down the asset list, use the Category drop down menu, or enter a keyword in the Search field.
-
Check the box next to the asset(s) you want, then click Link Selected to associate the asset(s) to the work order.
-
-
If you would like to notify others about this request, click the Notify Others link and click in the field to select their name from the available list.
-
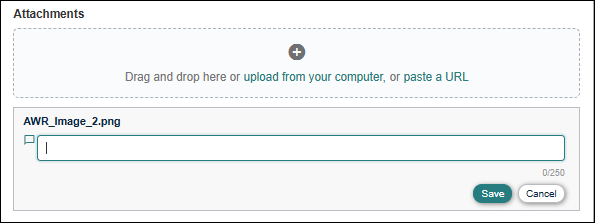
Click the (+) Attachments or drag and drop files to attach a document, photo, or other file to this request.
-
Upload files directly from your computer or add attachments using a URL.
-
Add, edit, and save notes for each attachment. Notes can contain up to 250 characters, and inline validation helps prevent errors.
-
View all attachments in an expanded list. Attachments remain visible and the drag-and-drop upload area is always available.
-
When deleting an attachment, a confirmation dialog appears to help prevent accidental removal.
-
-
Click Submit to save the request. Or if you have another request to enter for same application, click Add Another to save this request and bring up a new request form.
Adding a Work Request Using a Template
-
From the Add New Request screen, select the application for which you are submitting this request.
-
Select a template from the Issue Template drop down menu. You can use the search bar at the top to find the correct template.
Note: When Issue Template is mandatory, Location/Description/Details/Source of Work are disabled until a template is selected.
-
Enter Contact Name
-
Enter Contact Phone number.
-
Click the Subscribe to email updates to receive update notifications for this request.
-
Select Permission to enter to indicate that maintenance staff are authorized to enter the unit.
-
If Permission to enter is enabled in the resident record, the checkbox is automatically selected when that resident's location is chosen.
-
The request creator can also manually select the checkbox to notify the technician that entry is permitted.
-
-
Click on the Location Picker (
) to select a Location for the request.-
Use the type-ahead search to quickly find locations.
-
View the Recently Used section, which displays the five most recently selected locations.
-
Browse all available locations from the “All” location list.
-
Locations are displayed in a two-line format showing the location name and its hierarchical path.
-
Navigate search results using the keyboard and use the clear/reset (
) option to start a new search. -
If you have access to the Space Management application, click the map pin icon (
) to select a location from a floor plan drawing.Note: If you do not currently have this application, please contact your Sales Representative or Client Services for more information.
-
-
Enter a Description for the work that needs to be performed.
-
Type any additional details and notes in the Details box.
-
Choose a Source of Work from the pick list.
-
Check the Is Compliance Related box if the work will be performed to fulfill a compliance requirement.
Note: The Is Compliance Related box is only visible for users with the Can See Compliance Checkbox permission in User Roles Settings.
-
Click the Link Assets check box to link the associate work request with an asset.
-
The assets listed are items that are assigned to the location selected on the work request. You can expand this list to include all assets by clicking the Show All Assets checkbox.
-
To narrow down the asset list, use the Category drop down menu, or enter a keyword in the Search field.
-
Check the box next to the asset(s) you want, then click Link Selected to associate the asset(s) to the work order.
-
-
If you would like to notify others about this request, click the Notify Others link and click in the field to select their name from the available list.
-
Click the (+) Attachments or drag and drop files to attach a document, photo, or other file to this request.
-
Upload files directly from your computer or add attachments using a URL.
-
Add, edit, and save notes for each attachment. Notes can contain up to 250 characters, and inline validation helps prevent errors.
-
View all attachments in an expanded list. Attachments remain visible and the drag-and-drop upload area is always available.
-
When deleting an attachment, a confirmation dialog appears to help prevent accidental removal.
-
-
Click Submit to save the request. Or if you have another request to enter for same application, click Add Another to save this request and bring up a new request form.